Table of Contents
USB Flash Drives are one of the most popular ways to store and transfer photos. However, accidental deletion or corruption of photo files on your USB Flash Drive can happen easily. If you have accidentally deleted or lost photos from your USB Flash Drive, don’t worry! In this article, I will help you to know about some best methods to know how to recover permanently deleted photos easily. Keep reading to know about it!
check out more:
How to Fake GPS Location on iPhone? [ Detailed Guide]
4 Easy Methods to Screen Record on Windows (built-in recorder, OBS Studio, and AnyRec)
Part 1: How to Recover Deleted Photos from USB with Software
The easiest way to recover permanently deleted photos from USB is by using reliable and professional photo recovery software. In terms of the quality and functionalities, Wondershare Recoverit is a stand-out choice. It is easy to use on Windows and Mac devices, allowing users to check the recoverable data in preview before restoring and has a smooth/strong deep scanning technology.
Plus, Recoverit Photo Recovery is valuable in restoring different file formats of 1000+ different sizes, and getting results quickly. So, if you are planning to get a capable data recovery tool, this one is a legit choice to consider. Just keep on reading as here we are sharing detailed steps for utilizing this tool. The steps you need to follow are:
Step 1: Connect your USB Drive to your computer and launch Wondershare Recoverit on your system.
Step 2: The software will ask you to select a destination from where you need to recover the data and select the location as per your preference. It will then start scanning the selected drive.
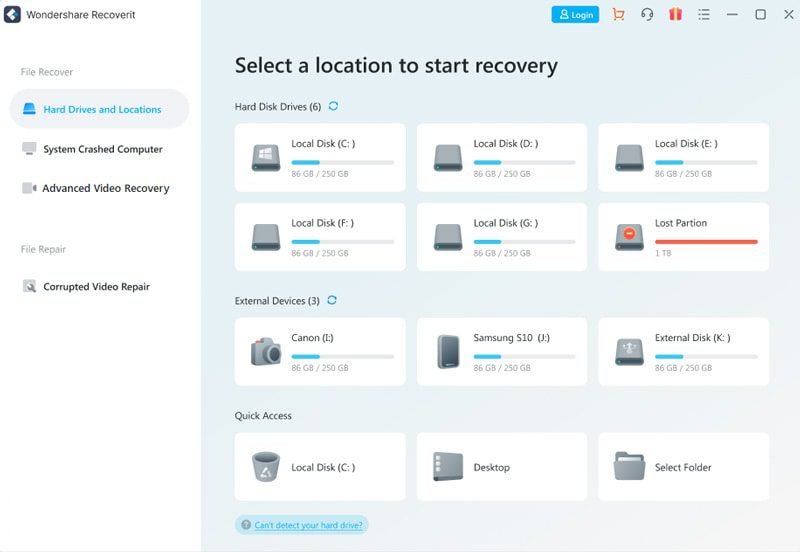
Step 3: Wait for the software to detect all the recoverable data. You can stop or pause to preview photos available on the USB Drive. The files this software supports recovering include videos, music, photos, Word document, Excel, PPT, PDFs, and all other major file types.

Step 4: Once you found the phots that you require, click on the “Recover” button to restore it.

Why choose Wondershare Recoverit?
When it comes to recovering lost or deleted photos from your USB flash drive, you want a reliable and affordable solution that can get the job done quickly and efficiently. That’s why we recommend Wondershare Recoverit, which is one of the most comprehensive data recovery on the market. Here are 5 reasons to choose Recoverit for your photo recovery needs:
1. Easy to Use:
Wondershare Recoverit is designed to be user-friendly, even for those who are not tech-savvy. The interface is straightforward and the steps for recovering your photos are laid out. Just launch the program and connect your USB drive to computer, then let Recoverit do its job.
2. Fast Scanning and Recovery:
Once you launch Recoverit, it will start scanning your USB drive for lost or deleted photos. The scanning process is very fast, so you won’t have to wait long to see the results. Once the scan is complete, you can preview the recovered photos and decide which ones you want to save.
3. Support for All Photo Formats:
Wondershare Recoverit supports all common photo formats, so you can recover any type of photo file from your USB drive, including JPEG, PNG, TIFF, and more.
4. Recover from over 2000 Storage Devices:
No matter what type of USB drive you are using, Recoverit can successfully scan it and recover your lost or deleted photos. This includes USB flash drives, memory cards, external hard drives, and more.
5. Free Trial Available:
If you’re not sure that Recoverit is the right photo recovery solution for you, you can try it for free before purchasing. The free trial allows you to scan your USB drive and preview the recoverable photos. If you’re satisfied with the results, you can then purchase a license to save the photos.
How to Recover Deleted Photos from USB Flash Drive Without Software?
If you don’t wish to use any software for recovering process, don’t worry as some methods can save you this time. These are:
Method 1: Recover from a backup:
Primarily, you must have an automatic backup option enabled to recover data effectively. Or else, the newly created files that are not backed up will have no chance of recovery with this method. As of right now, we all have a habit of syncing the data on clouds and google drivers. To recover files through the backup, the steps are as follows:
Step 1: Open the control panel and move to “System & Security” followed by selecting the “Security & Maintenance” option.
Step 2: Now, you need to select the “File History” option from the bottom left corner and click “Restore personal files” from the left thereafter.
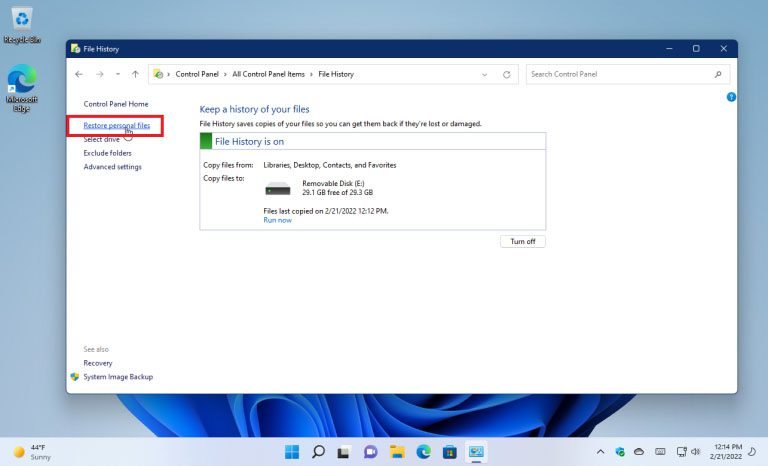
Step 3: Next, browse through all the files available, and once you found the file that you wish to recover, hit on Green colored “Recover” button to save the file.
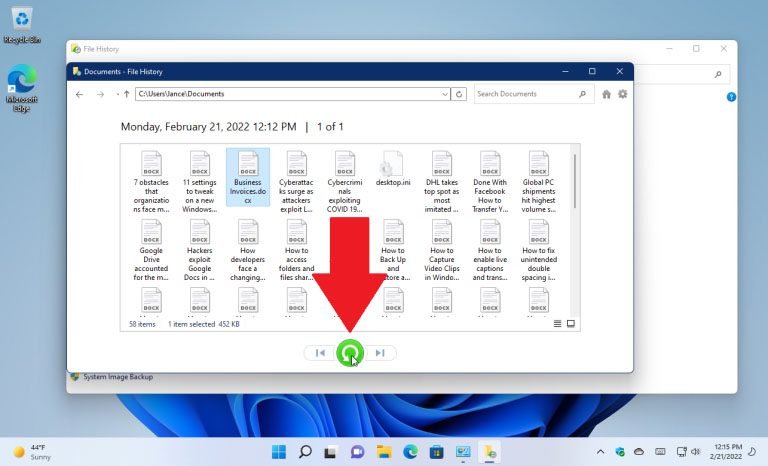
Note: This process is a bit time-consuming so be patient and wait until the process gets completed.
Method 2: Recover from CMD:
CMD also offers the option to users for recovering deleted photos from a USB flash drive. The steps one are:
Step 1: Open the dialog box with Windows + R and type “CMD” and hit the enter key.
Step 2: Here in the command prompt, mention the command “type the command ATTRIB -H -R -S /S /D F:*.*”
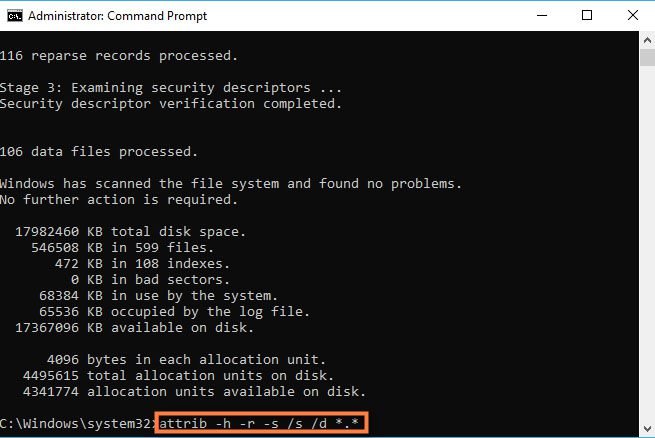
Note: (The letter F is indicating the flash drive. Change the letter as per the letter indicated by your computer)
Step 3: Wait for a minute until the process gets completed and you will get all the recovered files in a new folder on a USB drive.
Tips to avoid deleted photos on your USB Flash Drive!
There are a few tips that a user can keep in mind to avoid deleting photos on USB Flash Drive:
1. Use a reliable USB flash drive:
There are a lot of USB flash drives on the market, and not all of them are created equal. When it comes to storing precious photos, you want to make sure you’re using a reliable drive. Do your research and read reviews before purchasing a drive.
2. Backup your photos:
Even the best USB flash drives can fail. That’s why it’s important to back up your photos. Store them in multiple locations, including on your computer and in the cloud. That way, even if your flash drive fails, you’ll still have a copy of your photos.
3. Avoid using too much space:
Most USB flash drives have a limited amount of storage space. And when that space is filled up, it can lead to deleted photos. To avoid this, only store the photos you need on your flash drive. Delete old or unneeded photos to free up space.
4. Be careful when removing the flash drive:
When you’re finished using your flash drive, it’s important to remove it properly. Avoid just unplugging it from your computer, as this can lead to deleted photos. Instead, use the “Safely Remove Hardware” feature in Windows or the “Eject” feature on a Mac.
5. Use a photo recovery program:
Even with these tips, there’s always a chance that photos can be deleted from your flash drive. If this happens, don’t panic. Several photo recovery programs can help you get your photos back.
Following these tips can help you avoid deleted photos on your USB flash drive. But even with these precautions, things can still go wrong. That’s why it’s important to back up your photos in multiple locations.
Sum up
Recovering files is easy with the right tools. Just choose the best recovery software like Wondershare Recoverit and be ready to have access to all the lost files!
Overall, Wondershare Recoverit is an excellent choice for recovering lost or deleted photos from your USB flash drive. It’s easy to use, fast, and supports all common photo formats. Plus, the free trial allows you to try it out before you buy.
